Saturday 29 December 2012

Fitting a Fog Light - Part 1


Well, I need to get a fog light fitted to VIN 10719 before she can pass the UK MOT. For it to pass the car needs a rear red "fog light" which can be turned on ONLY when the headlights are on, and must have an illuminated switch or other warning light to show the driver that they are active. Phew!

This is the progress so far. It's not all done, but I'll add to the post as it evolves. 

I've decided not to go down the temporarily light route. Better to have a permanent  working fog light in this country. You never know  when you might need it. Although I have no intention of using the car in bad weather you never know.

My original option was to do the modification outlined by the "how to" section on the deloreans.co.uk club site. However, this calls for a live feed to be soldered to the PCB board next to the inner brake light, thus illuminating it constantly when the fog light switch is used. However, VIN 10719 has one of the new PJGrady PCB's which have a common positive track to both the inner and outer lights. If I supplied power to this track BOTH brake lights would illuminate at all times, which would cancel out the braking indication. A certain fail for the MOT. So it was on to plan B.

The centre light section of my rear light cluster is open and without a reflector. My plan is to place a new bulb holder into the top or bottom third of this section which can be independently controlled by the fog light switch, thus not modifying the original PCB in any way and keeping all original functionality, while satisfying the MOT requirements.

To do this I first had to route wiring to carry the live feed for the lights. From the back passenger side  rear light cluster I ran a 17 amp red cable back behind the number plate holder and round into the left hand pontoon and out through the engine bay release handle. This required removal of the catalytic converter from the left hand side of the engine bay to allow me to reach up and along the pontoon and push the wire through the gap in the firewall. I then threaded it down and along the central console (remove the ash tray and rear tray to aid this) and out through one of the dummy switches. 

I needed to fit an illuminated 16 amp switch here, which would be fitted to the dummy switch, and draw an earth for it from the cigarette lighter so it would illuminate when powered up. Then I threaded another wire back from the switch, along the centre console, and out in the fuse box section behind the passenger seat. Here I could tap into the headlight relay live feed to allow the rear fog lights to only work when the headlights were on. This connection would also be fused with an in-line fuse holder.


All seemed ok. Walking to the back of the car I picked up the wire for the rear lights which had been dangling on the floor. As I did it touched the side of the car and "bang" sparks flew as power arced to earth. WTF! how can that happen? the key wasn't even in the ignition. 
After some investigation it turns out that the out of the two wires to the cigarette lighter the outer purple wire was the live, not the inner red wire. WTF again! Surely the red should always be live. That needs some further investigation, but some swapping of wires later all was working as it should. (the live for both the cigarette light and the element were wired into the holder, so both the purple and the red wires were LIVE)

Well, I say as it should, but the actual lights I'd rigged up on the rear array were not as good as I hopped. To act as a fog light they have to glow a fair bit, and the two three-LED units I got for £5 (a bargain I thought at the time) just don't give out enough light.

The fix. Well I need a better set of lights and all should be good. I have a couple of ideas and will post an update soon on how this all turns out.

Fixing that Hand Brake or Parking Brake

The next bit on the list was the hand brake. It's been slipping since I got VIN 10719, which isn't a good thing when you have a sloping drive!

First of all I backed the car a little way out of the garage. As I've mentioned before its a single garage, and a tight fit. Not much room to open one door, let alone both. So, backing her out allows me to get at the rear wheels easier, and makes the whole job that bit simpler.


With the back of the car clearing the door frame I chocked the wheels at the front (essential as there wont be any brake at that end remember) and started to jack up the rear end. The jack point it on the cross member, between the two wheels and below the engine. Make sure to use some wood to make sure you don't damage the epoxy!   With the wheels up off the ground I used a few house bricks to support is as well (the stands I have wouldn't fit underneath at that point, but try to use stands wherever possible).

Taking the wheels off was pretty easy as well, which reveals the main and hand brake callipers. The smaller of the two on the top of the brake is the hand brake. Look for the large slot headed screw which adjusts the brake shoes. It has a cotter pin through it which needs to be released in order to tighten the screw. Remove this and tighten up to the disk, then slacken off one revolution. This should allow for a "tight" fit for the shoes, and a responsive break. Refit the cotter pin and repeat on the other side.

After refitting the wheels and using a torque wrench to tighten them 100 NIM the car was lowered down and the jack and bricks removed. I backed the car up and tried to use the handbrake to hold it on the sloping drive. Success! It held perfectly. 

It turned out to be simpler than I thought it would be.


Fitting UK Specification Headlights


Now to get VIN 10719 fully legal for UK roads it has to first pass what we call an MOT test (or Ministry of Transport test, as it used to be called) before the car can be registered for us on UK roads. There are a number of modifications that need to be made to any US car in order to pass this MOT. As we drive on the left here the US spec lights point in the wrong direction and would "dazzle" any oncoming traffic. Plus in the UK the outer lights must have a clear white "running light", rather than the amber running lights below the headlights that illuminate on the DeLorean.

The correct size of replacement light was the first problem. The lights are 4X6" in size, and can be sourced from either Valeo or Hella. The Valeo units are a simple swap for the outer lights, and even come with an adaptor for converting the 4656 style headlight harness on the DeLorean to the H4 standard. The Hella units are similar, but the side light sticks out of the back of the headlight, meaning the headlight buckets behind need to be cut to fit. 

The Valeo sounded like the best bet, but at the time of writing seem to be unavailable in the UK. So, the Hella units it was. I managed to get them from this site: HERE

The part number for the lights is 1LB003 177-511 which is an Audi part, but fits the DeLorean perfectly. 

Its important at this stage to say that you only need to change the outer lights to pass the UK MOT test, but I decided to remove all four. That way I could fit four of the above units and have four running side lights instead of just the two. In my mind this makes far better use of the extra set of lights on the car. Why have four headlights and only use the inner ones for high beam!


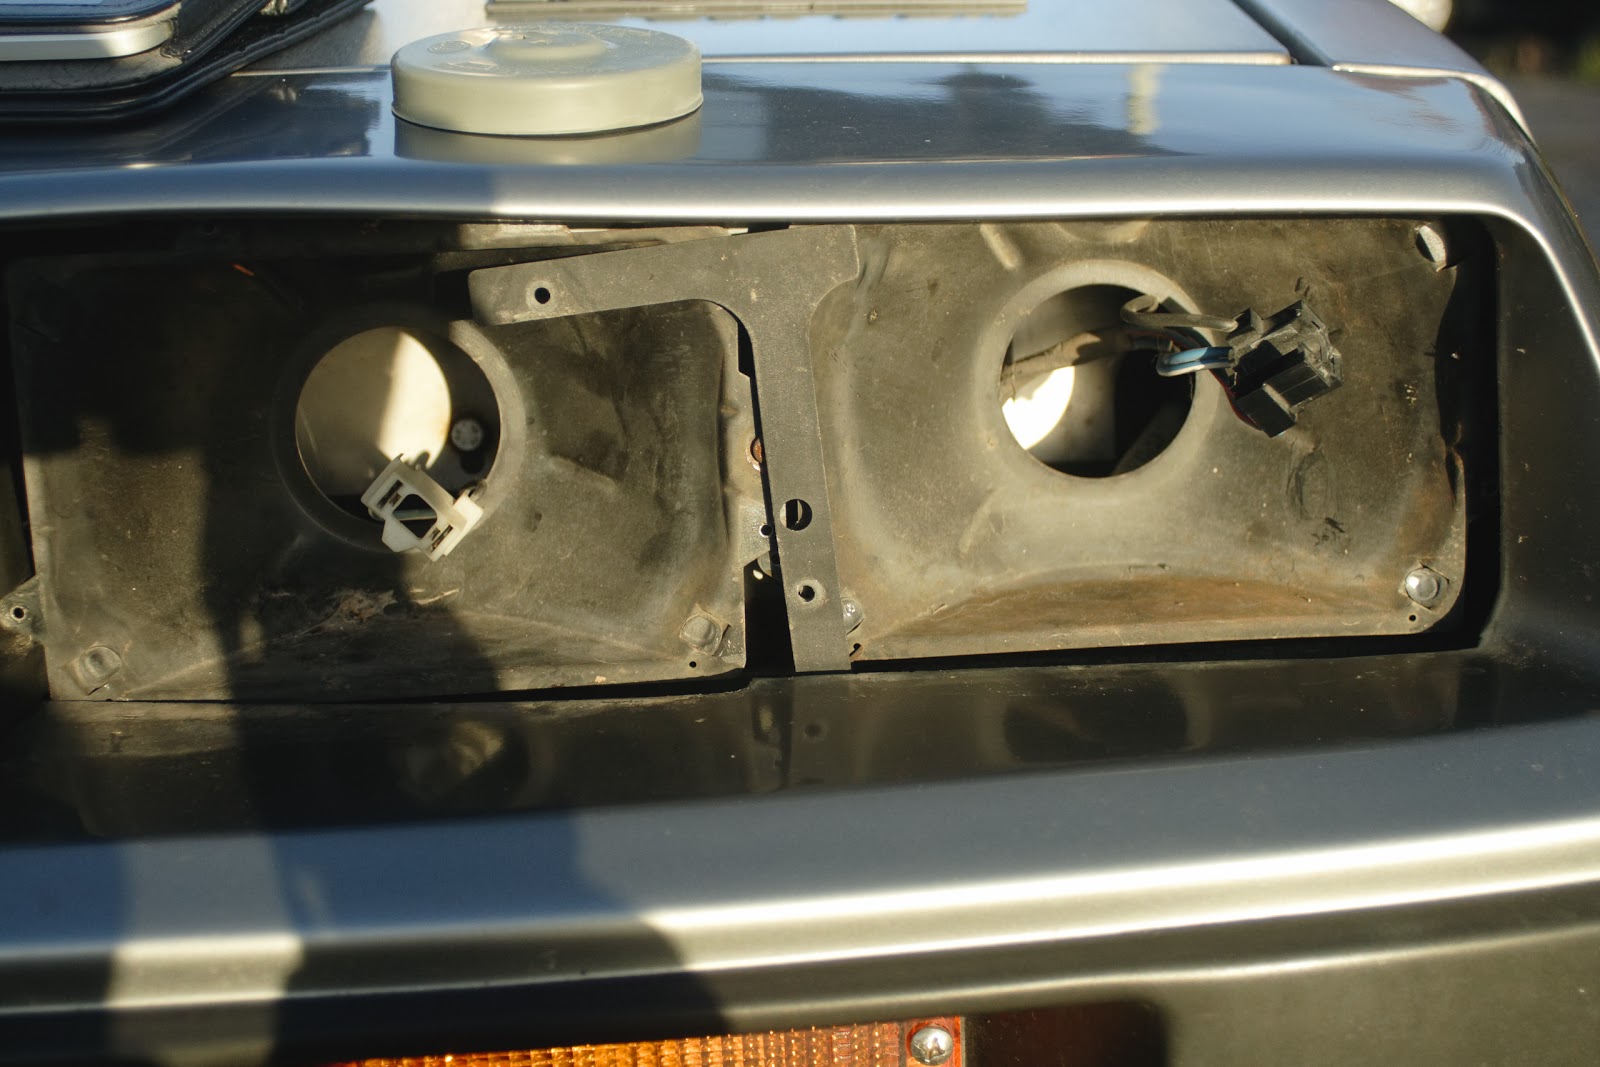
The first stage to fitting the lights was to get the originals off the car. This went fairly easily really. The lights are held in to the buckets by some metal retaining brackets which fit snugly over the glass surrounds to the lights. These are in in turn held in place by four short screws into the light buckets. These screws are a pain to get to on the outer lights. You will find that you have to carefully bend up the fascia to access these and unscrew them. A magnetic screw driver is a real bonus as the screws are easy to loose into the body of the car. 

Once these are removed you can pull out and unplug the lights themselves. keep them safe, you never know when you might need them! Now, as I'm fitting the Hella units I decided to also remove the buckets at this point. I can then cut out the hole needed for the side lights and repaint them before sticking them back in. These buckets are held in by three adjustment screws and a single spring each. These screws move the buckets back and forth, allowing for adjustment in both planes. They looked like they needed a bit of TLC, and as you'll see later one was stripped of its head while I fought to remove it. The posidrive head on these wasn't really made to stand up to the elements and tends to corrode. 

With the buckets out I needed to cut a hole in the back for the extra long sidelights. After some thought I decided to use a stink tap hole cutter to cut out the hole. I needed to drive a pilot hole first for the cutter, then using a spanner tighten the cutter until it cut a perfect round hole. Simple! With that done to each of the four buckets I painted them in black spray paint to protect them and seal the bare metal I'd exposed by cutting the holes.
Returning to the car the support bracket behind the lights was in a sorry state. Not as bad as some, but not good. I decided to clean off the rust and repaint in black to match the buckets. Better protection for later as well. It wasn't the best finish in the world, but its not going to be seen and will protect the metal for a good few years. 
Now came the point of adding the electrics. Now, first off I needed to change the side amber light to blink in time with the indicator. I also needed to disable the "constant on" amber light when the side lights are on. To do both I first found the three wires that run down to the amber front light (black, green and red). The red is the live, black the earth and the green is the "flashing live" wire. I cut the red live wire, so disabling the constant running light, and put a spade connector on the end. This live can be used for one of the new side lights. I then used a scotchloc to tap into the green wire and ran this over to the amber side light feed (NOTE: I've since learned that scotchlocs are not recommended for this type of thing and will be using good old solder and heat shrink. I recommending doing the same). You can then cut the red "live" to the amber side light and connect the light side of the red wire to the new "blinking" live from the front amber light. This also frees up another live for the outer new side light. Perfect!


Finally, the connector for the outer main lights needs to be modified. The connectors need to be changed round as per the diagram on this page. To get the originals out simply use a small screw driver pushed carefully into the socket to release the tabs and withdraw the connector. At this point you can put in a second wire into the earth connection to be used as an earth for the new side lights. Put a spade connector on this wire as before.


At this point it should be a simple case of reversing the procedure and fitting everything back into the front of the car. But no, it wouldn't be that simple. Although I had cut some nice sized holes in the back of the buckets for the new side lights I hadn't figured in that the metal frame behind these would still obstruct them from going back all the way, especially with the spade connectors attached. After some thinking I decided to modify the side light holders. I first cut them down in length using a hacksaw, then soldered both live and earth wires direct to the connectors on the back. I also bent these connectors at 45 degrees to help with getting them in. With the addition of a spade connector at the end of each wire they were ready to be fitted once more into the car.


In the end they worked perfectly, and I love the four lights illuminated when the side lights are on. One further modification I might do is fit LED side lights. I nearly did this with some 12V high output surface mounted LED's I had about the place, but the rather hot capacitor that went with them in the end put me off. Watch this space for that development!

Sunday 16 December 2012

16th of December - First day of repairs.


Well, yesterday I gave the car a good wash. After her journey from the states and then up from Southampton there was quite a bit of black dust and dirt on the car. Plus it gave me a great chance to check her out again. After a problem starting her due to a flat(ish) battery (more of that later) I managed to carefully get her out of the garage. One slightly brown pant moment when she stalled on the slope out of my garage and I discovered that the handbrake was slipping! Wonderful! Not easy to start a manual car, on a slope with a slipping handbrake. Think about it!

But, today is another day and she came out without too much stress. Maybe I'm just getting used to her and that high biting point clutch. Now to try that list of niggles.

The fuel smell seems to have vanished, so maybe it was just the overspill at the petrol station. Following the initial start where she gave out a little white smoke (it's cold and to be expected considering her age) she ran very clean. Good to know the fans are kicking in without a problem at 150 degrees. Fingers crossed that's sorted. Love it when a problem just vanishes.

The dead pedal had fallen off shortly after leaving Southampton. Simple fix on close inspection. Two bolts hold the pedal in place and after first removing, checking and reinserting the rubber pad it was quick to screw back in place. Sorted!

Now, that stereo. Again, this was fairly easy. Rather than just jump in and start ripping things out I decided to first check the connections on the speakers, clean them up and re-insert. Then I checked the connections on the stereo itself. After reseating a couple the four speakers sprang into life. Not the best sound system in the world, but it works! Nothing like music while you work as well.


Now for something a little more challenging. That brake light issue. Now, my first thought was that it must be the master cylinder being low on DOT4 fluid. The cylinder can be accessed from the luggage compartment below a rubber bung. To get full access (and to review the condition of the cylinder) I decided to remove the access hatch, held in with a series of black screws. Now, some of these looked original, some looked to be more self tapping screws rather than bolts. All had less than perfect heads on them. One had obviously been stripped and the previous owner had (part) drilled it out. I'll be replacing these at some point.

The master cylinder has a filling screw top with a sensor connected at the top. The reservoir was full to the max, so no leaks ( good news all round). So why the brake light on the dash? Well, on unplugging the sensor connection the fault became obvious. The socket was full of silicone grease. Grease = no closed circuit, which in turn means a warning light. A quick clean and all seemed well again. Another one down.

Next was the cigarette lighter. On the way home the lighter socket refused to work. A real pain as my sat nav has a duff battery which did well to last us half the journey. It was present for all the major stuff, but I'll be needing that socket to work later. Pulling the lighter itself out revealed a messy and corroded barrel, especially on the inside at the bottom where the lighter (or any other adaptor) made contact. Some WD40 and a good clean with an abrasive cloth later the bare metal showed through once more. Sure enough once reconnected to the cables in the console power was present. I know because it sparked across the gap when I tried to pull out the lighter with a pair of pliers, not to mention the lighter started to heat up and produce white smoke. That'll be the WD40. 

Anyway, this fix done it suddenly hit me that this could have been the cause of the battery running down so quick. Following it not working we had inserted back into the socket the lighter, which then had been making contact with the pins in the base. Now, the pins being that corroded meant that not enough current was present to heat the lighter and therefore have it pop out of the holder, but enough current was getting through to both heat the lighter a small amount, plus drain the battery. Problem solved (I hope). I'm just glad the lighter didn't get any hotter!

The mirrors again proved to be easy. I'd read online that some of the connections can become dislodged. So, to access these simply use a screwdriver to pop out the housing and check the connections. Well, no matter what it refused to move. Just as I was about to give up I knocked the adjustment joystick and the mirrors moved up on the passenger side. Not a perfect slip, and considering I'd done so little probably not a permanent one either. But it has allowed me to move the mirror into a good position on that side at any rate. Job half done, and one to return to. 

I also managed to remove the original US lights, ready for the UK spec Hella units to go in. Some of the screws are a little fiddly and need the patience of a saint to remove. Plus they are sometimes behind the front fascia plastic, so a magnetic, thin screwdriver is a must. Be careful with them as well as they are small and easily lost. Try doing it as I did on the road,  in December with a covering of water and muck on the road. Nice!

Once out you can see that the buckets for the lights will need a hole drilling in them to allow for the sidelight. On the Hella units this sticks out at the back, unlike the sealed units on the originals. Veleo versions of the lights are available and are pretty much a straight switch. They even have an adaptor for the connection to the H4 bulb, which mine don't. But at the time of writing these are rarer than rocking horse poo to get hold of, so the Hella units are the best fit for now. 

Now, originally the inner lights performed the side light function, and the over ones the full and dipped beam. I've opted to change all four units, although technically you only need to change the outer lights for the UK MOT. However, the inner ones being sealed units there will be a time when the bulb goes and I'll need to change them. Plus they won't match the more modern looking outer. Therefore I'm changing all four. As all  four units can hold a H4 bulb I'm going to wire them up so that full and dipped beam work on all four. Should help with them lighting up the road. As for the amount of amps drawn on the circuit on high or low beam, I'm not sure. I'll have to check this out and see. Watch this space. In the meantime the lights are out and ready for the buckets to be drilled or cut to allow for the side lights. Another job half done anyway.

With that all done I just checked out the relay and fuse box of the car. It all looks to be in order, and many of the key updates have been done, such as the fan fix which makes sure the fans come on correctly and without melting the fuse box. All looks good.


Now the final touch was to reinstate the original gear shift knob I cleaned up and restored even before the car got into the UK. The stainless steel one on the car from the previous owner is really nice, and I'll be keeping it. Its one hell of a weighty bit of metal, embossed with the DMC logo. Very nice, but somehow I wanted the original to be put back where it belonged. I never thought I'd say that. The originals always looked a little rough to me, but my refurbished shifter knob looks great back in its rightful place.

With that it was time to put her back in the garage, front first this time. This proved to be a lot easier than going in back first, plus it had the added advantage of allowing the drivers door to open fully. Yah! Oh, one word of advise, never get cheap silicone spray near yo windscreen, especially when its getting dark and your DeLorean is without lights. Nightmare to get the stuff off, and a bugger to see through in the dim light. 

Collection Day!

It's been a while since I last updated everyone on the progress of VIN 10719, but the car is finally in the UK, and finally in my garage. It's actually been a week since picking her up and making the journey back from Southampton. As I'm writing this I'm thinking about what I need to do today to fix some of the issues with the car and get it ready for the MOT, now booked for the 3rd of January. But first a little update on the fateful day of collection.


We travelled down the day before collection from Leicester by train (my co-pilot for the day and me). I'd considered having the car transported up to the Midlands, and while costing not much more than actually driving it back it just seemed right to collect the car in person and drive it back. Maybe not the most sensible option considering its left hand drive manual, I'm not used to the car and have never driven a non-power assisted car, not to mention its a completely unknown entity with regards what's working and what's not. But hay-ho, sometimes you just have to go with your gut on these things. Would I recommend this option, probably not, but it all worked out for me.

I'd sorted out insurance on the VIN number prior to collection. This is a MUST if your thinking of driving any car, let alone one as valuable as a DeLorean. Plus its also illegal to drive any vehicle on UK roads without some sort of insurance. I managed to get a full years worth of insurance for under £300.

After staying the night in the wonderful Star Hotel (worth a whole post on it's own) we got to the port to collect the car, dragging bags with us. After walking all the way down the dock (a good mile) we reached the address Hill Shipping had given me for collection, only to be told that we had to go all the way back to the other end, one mile back the way we had come! Thank god a guy gave us a lift back up the port service road. Then, following a bit of paperwork and some raised eyebrows at the fact I'd be driving the car back to the Midlands, we were told to wait outside for someone to bring the car down. So we waited, and waited. Still no sign of the car. Seems after being fine for so long the car had decided to throw a strop and was refusing to start. Flat battery seemed to be the cause. 


Following a couple of power packs (seems this is quite normal for cars arriving in port) she finally appeared. Now, I had an image in my mind of how my first drive in a DeLorean would go. At no point did this image include jumping into the car without even being able to adjust the mirrors or take off the plastic covering the seats. Nor did it involve having to deal with a busy Southampton traffic as I rushed the car to the nearest petrol station as she was nearly out of gas! Seems even though she had half a tank in her when leaving the US the shipping company had been kind enough to drain the tank to mere vapours just for me! How good of them....

First thoughts on driving the car. Well, both exciting and terrifying in equal amounts. Left hand drive with the gear stick on the right. Not something I'm used to at all. Plus I've only ever driven cars with power assisted steering and the  DeLorean felt HEAVY. Very heavy. The clutch and brakes also felt very alien, again being used to power assisted modern cars. But I got used to them fairly quickly (some gear changes were awful let me tell you). But the sense of going back to basics and learning to drive again was very strong. Its a completely different car to drive than any modern car. Once you get used to it though you'll love it. The feeling of being truly connected to the car is second to none. Just takes some getting used to things.


Getting to the petrol station I go my first taste of the interest a DeLorean can generate. I hadn't even got out of the car to fill her up and a guy had appeared at the window wanting to know all about it. I gave him the full run down while filling the tank, which resulted in me over filling the tank and spilling fuel everywhere. Seems its a right of passage with DeLorean ownership.

The rest of the journey was fairly uneventful. Some moments where gear changes could have been better (practice needed there) and occasional lane adjustments (LHD is a bugger). The car continued to attract attention with people waving and taking pics. DeLorean ownership certainly ain't for the retiring types among us. The weather was great, and the journey was a pleasure.


On getting the car back home I had to contend with the "standard" garage. For "standard" read "tight as hell". The DeLorean ain't as small as I thought it was. She managed to fit in, but as for opening the doors, lets just say I'm glad I'm slim. There's not much room.

As for things that need attention. Well here is the (preliminary) list:


  • Major problem with the front spoiler and rock screen. Seems like both have been damaged in transport. It looks like the front of the car has come to rest on something, which has pushed up then shattered the underside of the Spoiler and bent the rock screen. Not happy at all! Something for the insurance.
  • The battery cover has also been split slightly, probably when the guys at the dock tried to start the car. Looks like over heavy handedness on their part. Looks like they also managed to loose a couple of retaining bolts. Again, have to claim on the insurance. 
  • There is a smell of petrol in the cabin. Might be my slip at the petrol station, we'll see.
  • The brake light stayed on during the whole journey and on a couple of occasions I had to push almost to the floor before I got any braking response. Not good! I'll have to buy more underwear if that keeps up.
  • The electric mirrors work left and right, but not up and down. That needs fixing right away, if only so I can get her in and out of the garage.
  • The stereo doesn't seem to work. No FM reception (might be the lack of UK support) and only one speaker working. That 80's compilation for the journey home ended up going to waste! That needs fixing asap.
  • The clutch has a very high biting point, and seems to slip when you put your foot down. When accelerating on the motorway the engine seemed to rev at first without and perceivable increase in speed. Maybe inked to the brakes, low fluid levels maybe? Needs sorting though. Hopefully not a clutch problem!
Other than these she was perfect. Getting her back safe and sound was a wonderful feeling. I remember getting out of the car after the long journey and just looking at the car. I can't believe how good she looks, and she's mine!

Saturday 8 December 2012

The ship approaches Southampton


The Taiko and my car approaching good old blighty!
Well, finally, and after many long weeks of waiting the ship and the car can be seen here approaching Southampton dock. The carter is now two days late thanks to an incident in the North Sea involving two container ships (thank god not mine) where one ended up sinking.


Getting even closer!

However, all is well and the car should clear customs fairly quickly, one working day according to my shipping agent. I've also sorted out fully comp insurance for the DeLorean which will kick in as soon as she hits UK soil. Breakdown insurance is also included, which is probably prudent for a 31 year old car. The seller assures me that she's running fine, but as I'm planning on driving her back from the dock some sort of backup should she have a hissy fit on the way is always a good idea. Equipment wise for the trip I'm going with the following:

  • Jump leads (just in case the battery is dead after the long trip. DeLoreans are prone to a slow discharge to earth, so you never know. Not going to get far without a battery!
  • Foot pump. Again, those big tyres might need a top up before we get underway.
  • Pliers and socket set, for those emergency repairs!
That should do it, oh along with a full selection of 80's classics on the iPhone. Well it has to be done.